
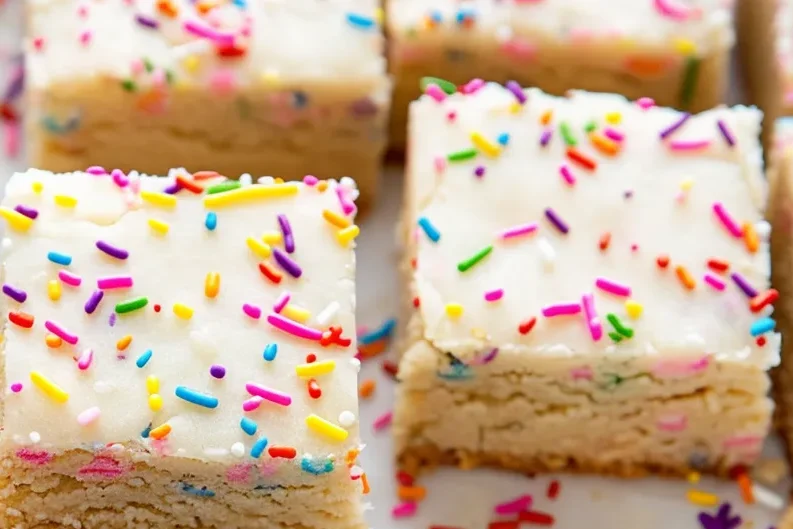
Birthdays in our house are a proper affair, full of streamers, silly hats, and, of course, a mountain of treats. While a towering birthday cake is always a welcome sight, sometimes I crave something a little less fussy, a bit more… well, manageable. That’s where these Birthday Sugar Cookie Bars come in. I’ve been tweaking this recipe for years, aiming for that perfect balance of chewy, sweet, and utterly irresistible. These bars are now a firm favourite, especially with my two little ones, who adore helping me sprinkle on the hundreds and thousands. Prepare yourself for a slice of pure joy, guaranteed to bring smiles to faces of all ages!
Why This Recipe Works
As a mum with a busy schedule, I need recipes that are straightforward and deliver delicious results without requiring hours in the kitchen. These Birthday Sugar Cookie Bars tick all the boxes. Here’s why they’re a winner in my book:
- Quick and Easy: From mixing to baking, these bars come together in under an hour, perfect for those last-minute birthday cravings or afternoon treats.
- Kid-Approved: My children are my toughest critics, and they absolutely adore these bars. The colourful sprinkles make them extra appealing.
- Budget-Friendly: Using common ingredients you likely already have in your pantry, this recipe won’t break the bank.
- Adaptable: Easily customise the sprinkles, frosting, or even add chocolate chips for a unique twist.
Ingredients
- 225g unsalted butter, softened
- 200g granulated sugar
- 100g light brown sugar, packed
- 2 large eggs
- 1 teaspoon vanilla extract
- 375g plain flour
- 1 teaspoon baking powder
- ½ teaspoon salt
- 120ml milk
- 1 teaspoon vanilla extract
- 450g icing sugar
- Hundreds and thousands sprinkles, for decoration
Ingredient Notes
Let’s break down some of the key ingredients and how to make the most of them:
- Unsalted Butter: Using unsalted butter allows you to control the saltiness of the bars. Make sure it’s properly softened – not melted – for a smooth batter. If you only have salted butter, reduce the amount of salt in the recipe by ¼ teaspoon.
- Light Brown Sugar: This adds a lovely chewy texture and subtle caramel flavour. If you don’t have light brown sugar, you can use dark brown sugar, but the flavour will be slightly richer.
- Plain Flour: Essential for the structure of the bars. Make sure you measure it accurately by spooning it into your measuring cup and levelling it off. Don’t pack it down!
- Hundreds and Thousands: These iconic sprinkles are readily available in most UK supermarkets. Feel free to use any sprinkles you fancy to make your sugar cookie bars pop.
Step-by-Step Instructions
Now, let’s get baking! Follow these simple steps for perfect Birthday Sugar Cookie Bars every time:
Step 1: Preheat your oven to 180°C (160°C fan/Gas Mark 4). Grease and line a 9×13 inch baking tin with baking paper, leaving an overhang on two sides for easy removal.
Step 2: In a large bowl, cream together the softened butter, granulated sugar, and brown sugar until light and fluffy. This might take a few minutes, but it’s crucial for a good texture. You should see the mixture become noticeably paler.
Step 3: Beat in the eggs one at a time, then stir in the vanilla extract. Make sure each egg is fully incorporated before adding the next. Scrape down the sides of the bowl to ensure everything is evenly mixed.
Step 4: In a separate bowl, whisk together the flour, baking powder, and salt. Gradually add the dry ingredients to the wet ingredients, mixing until just combined. Be careful not to overmix, as this can lead to tough bars.
Step 5: Press the dough evenly into the prepared baking tin. I find it easiest to use my fingers or the back of a spoon to spread it out smoothly.
Step 6: Bake for 20-25 minutes, or until the edges are golden brown and a toothpick inserted into the centre comes out clean. Keep a close eye on them, as ovens can vary.
Step 7: While the bars are baking, prepare the icing. In a large bowl, whisk together the milk and vanilla extract. Gradually add the icing sugar, mixing until smooth.
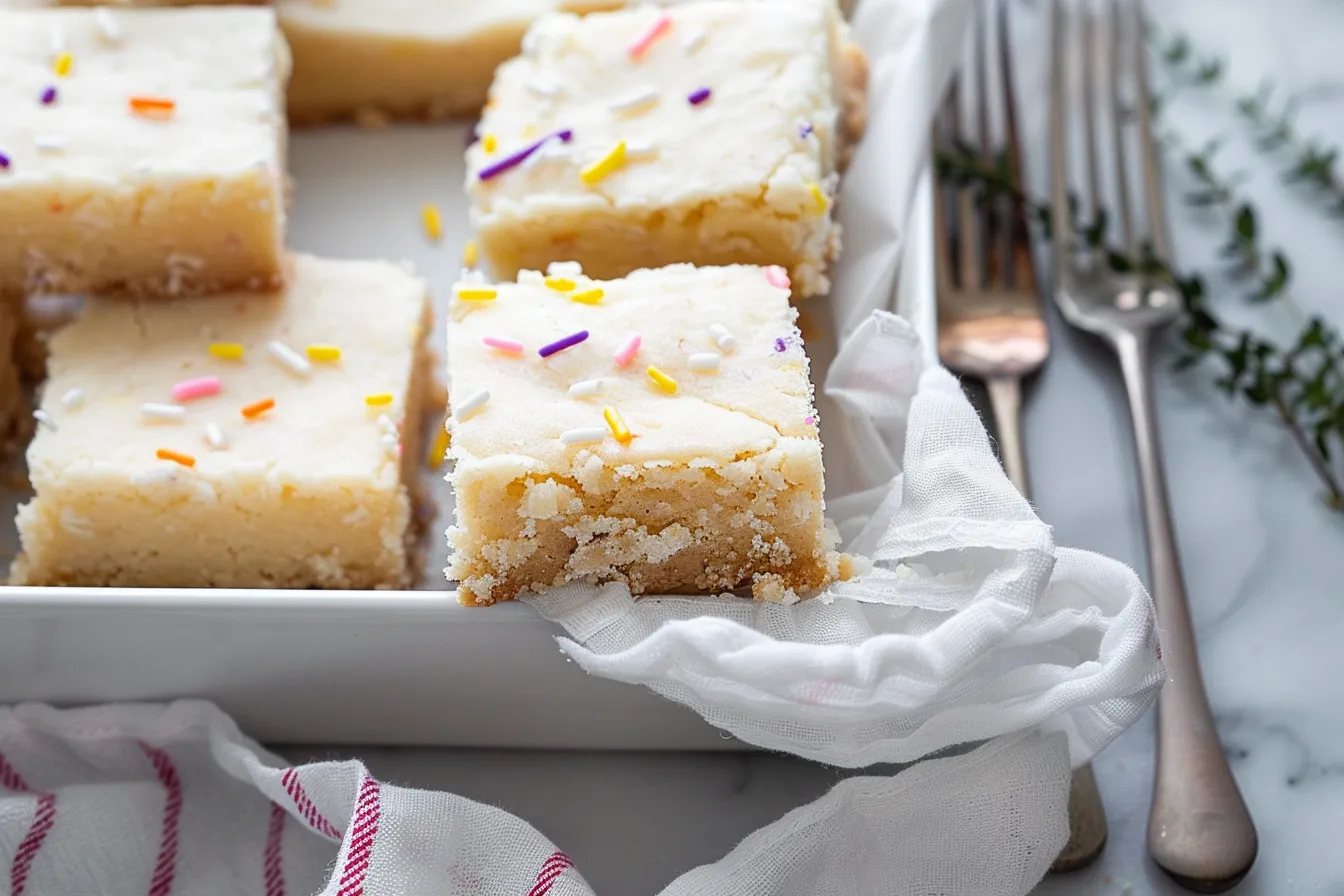
Step 8: Once the bars are out of the oven, allow them to cool completely in the tin before frosting. This prevents the icing from melting. Lift the bars out of the tin using the baking paper overhang.
Step 9: Spread the icing evenly over the cooled bars. Immediately sprinkle generously with hundreds and thousands. The icing sets quickly, so make sure to get those sprinkles on before it does!
Step 10: Cut into squares and serve. These are best enjoyed fresh, but they will keep well for a few days in an airtight container.
My Kitchen Tips & Tricks
Here are a few of my tried-and-true tips for making these Birthday Sugar Cookie Bars even easier and more delicious:
- Don’t Overbake: Slightly underbaked bars are better than overbaked ones. They should be soft and chewy, not dry and crumbly.
- Softened Butter is Key: Make sure your butter is properly softened, but not melted. If you forget to take it out of the fridge in advance, you can microwave it for a few seconds, but be very careful not to melt it.
- Chill the Dough (Optional): If you have time, chilling the dough for 30 minutes before baking can help prevent the bars from spreading too much in the oven.
- Get the Kids Involved: These bars are a great recipe to make with children. Let them help with measuring, mixing, and, of course, sprinkling!
- Make Ahead: You can bake the bars a day in advance and frost them just before serving.
- Even Sprinkling: For an even distribution of sprinkles, hold your hand a few inches above the bars and gently shake them over the icing.
- Clean Cuts: To get clean, even cuts, use a sharp knife and wipe it clean between each slice.
Storage & Meal Prep
These Birthday Sugar Cookie Bars are great for making ahead or storing leftovers. Here’s how I handle them in my kitchen:
- Storage: Store the bars in an airtight container at room temperature for up to 3 days. They can also be stored in the fridge for up to a week, but they may become slightly firmer.
- Freezing: You can freeze the baked bars, unfrosted, for up to 2 months. Wrap them tightly in cling film and then place them in a freezer bag. Thaw at room temperature before frosting.
- Make Ahead: The dough can be made up to 2 days in advance and stored in the fridge. Bring it to room temperature for about 30 minutes before pressing it into the baking tin.
Substitutions & Variations
Want to mix things up a bit? Here are a few substitutions and variations you can try:
- Gluten-Free: I haven’t personally tested this recipe with gluten-free flour, but you could try using a 1:1 gluten-free flour blend. Be sure to add a binder like xanthan gum to help with the texture.
- Dairy-Free: Use a dairy-free butter alternative and dairy-free milk for a dairy-free version.
- Chocolate Chip: Add 100g of chocolate chips to the dough for a chocolatey twist. My children love this version!
- Different Sprinkles: Get creative with your sprinkles! Use different colours, shapes, or even edible glitter.
- Flavoured Icing: Add a drop of lemon or almond extract to the icing for a different flavour profile.
Frequently Asked Questions
Can I prepare this the night before?
Absolutely. In fact, I often do this on Sunday evenings before the busy school week. Simply prepare everything up to the baking stage, cover tightly, and refrigerate. Bring it to room temperature for 15 minutes before cooking, and you’ll save yourself precious morning time.
How do I know when the bars are done?
The edges should be golden brown, and a toothpick inserted into the centre should come out clean or with a few moist crumbs. Be careful not to overbake them, as they will become dry.
Can I use a different type of sugar?
While I recommend using granulated and light brown sugar for the best texture and flavour, you can experiment with other types of sugar. Dark brown sugar will give a richer flavour, and caster sugar can be used in place of granulated sugar. Just bear in mind that the texture might be slightly different.
How should I store the leftover bars?
Store the bars in an airtight container at room temperature for up to 3 days, or in the fridge for up to a week. They can also be frozen for up to 2 months.
Will my children enjoy these?
In my experience, children absolutely love these bars! The colourful sprinkles and sweet flavour are a hit with most kids. You can even get them involved in the baking process.
Can I halve the recipe?
Yes, you can easily halve the recipe to make a smaller batch. Use an 8×8 inch baking tin and adjust the baking time accordingly.
What if my icing is too thick or too thin?
If your icing is too thick, add a little more milk, a teaspoon at a time, until it reaches the desired consistency. If it’s too thin, add more icing sugar, a tablespoon at a time, until it thickens up.
Serving Suggestions
These Birthday Sugar Cookie Bars are delicious on their own, but here are a few serving suggestions to elevate them even further:
- Serve with a scoop of vanilla ice cream for a decadent treat.
- Pair them with a glass of cold milk or a cup of tea.
- Cut them into smaller squares for party snacks.
- Present them on a pretty platter for a special occasion.
In our home, these bars are often enjoyed alongside a big slice of birthday cake, because why not have both? My children also love them with a simple glass of milk after school.
So there you have it – my go-to recipe for Birthday Sugar Cookie Bars that are sure to bring a smile to everyone’s face. Baking these bars is a simple joy, a way to create a little bit of magic in the midst of our everyday lives. The scent of vanilla and sugar filling the kitchen, the colourful sprinkles scattered across the icing… it’s a feast for the senses, and a memory in the making. I truly hope you’ll give this recipe a try, and I’d absolutely love to hear what you think. Feel free to share your honest feedback in the comments below, and don’t forget to browse my other recipes for more family-friendly inspiration. Happy baking!`
PrintBirthday Sugar Cookie Bars Recipe
Bake amazing birthday sugar cookie bars Easy recipe creates delicious bars for parties Find quick baking techperfect dessert
- Prep Time: 15 minutes
- Cook Time: 25 minutes
- Total Time: 40 minutes
- Yield: 16
- Category: Dessert
- Cuisine: British
Ingredients
- 225g unsalted butter, softened
- 200g granulated sugar
- 100g light brown sugar, packed
- 2 large eggs
- 1 teaspoon vanilla extract
- 375g plain flour
- 1 teaspoon baking powder
- ½ teaspoon salt
- 120ml milk
- 1 teaspoon vanilla extract
- 450g icing sugar
- Hundreds and thousands sprinkles, for decoration
Instructions
- Preheat your oven to 180°C (160°C fan/Gas Mark 4). Grease and line a 9×13 inch baking tin with baking paper, leaving an overhang on two sides for easy removal.
- In a large bowl, cream together the softened butter, granulated sugar, and brown sugar until light and fluffy. This might take a few minutes, but it’s crucial for a good texture. You should see the mixture become noticeably paler.
- Beat in the eggs one at a time, then stir in the vanilla extract. Make sure each egg is fully incorporated before adding the next. Scrape down the sides of the bowl to ensure everything is evenly mixed.
- In a separate bowl, whisk together the flour, baking powder, and salt. Gradually add the dry ingredients to the wet ingredients, mixing until just combined. Be careful not to overmix, as this can lead to tough bars.
- Press the dough evenly into the prepared baking tin. I find it easiest to use my fingers or the back of a spoon to spread it out smoothly.
- Bake for 20-25 minutes, or until the edges are golden brown and a toothpick inserted into the centre comes out clean. Keep a close eye on them, as ovens can vary.
- While the bars are baking, prepare the icing. In a large bowl, whisk together the milk and vanilla extract. Gradually add the icing sugar, mixing until smooth.
- Once the bars are out of the oven, allow them to cool completely in the tin before frosting. This prevents the icing from melting. Lift the bars out of the tin using the baking paper overhang.
- Spread the icing evenly over the cooled bars. Immediately sprinkle generously with hundreds and thousands. The icing sets quickly, so make sure to get those sprinkles on before it does!
- Cut into squares and serve. These are best enjoyed fresh, but they will keep well for a few days in an airtight container.