
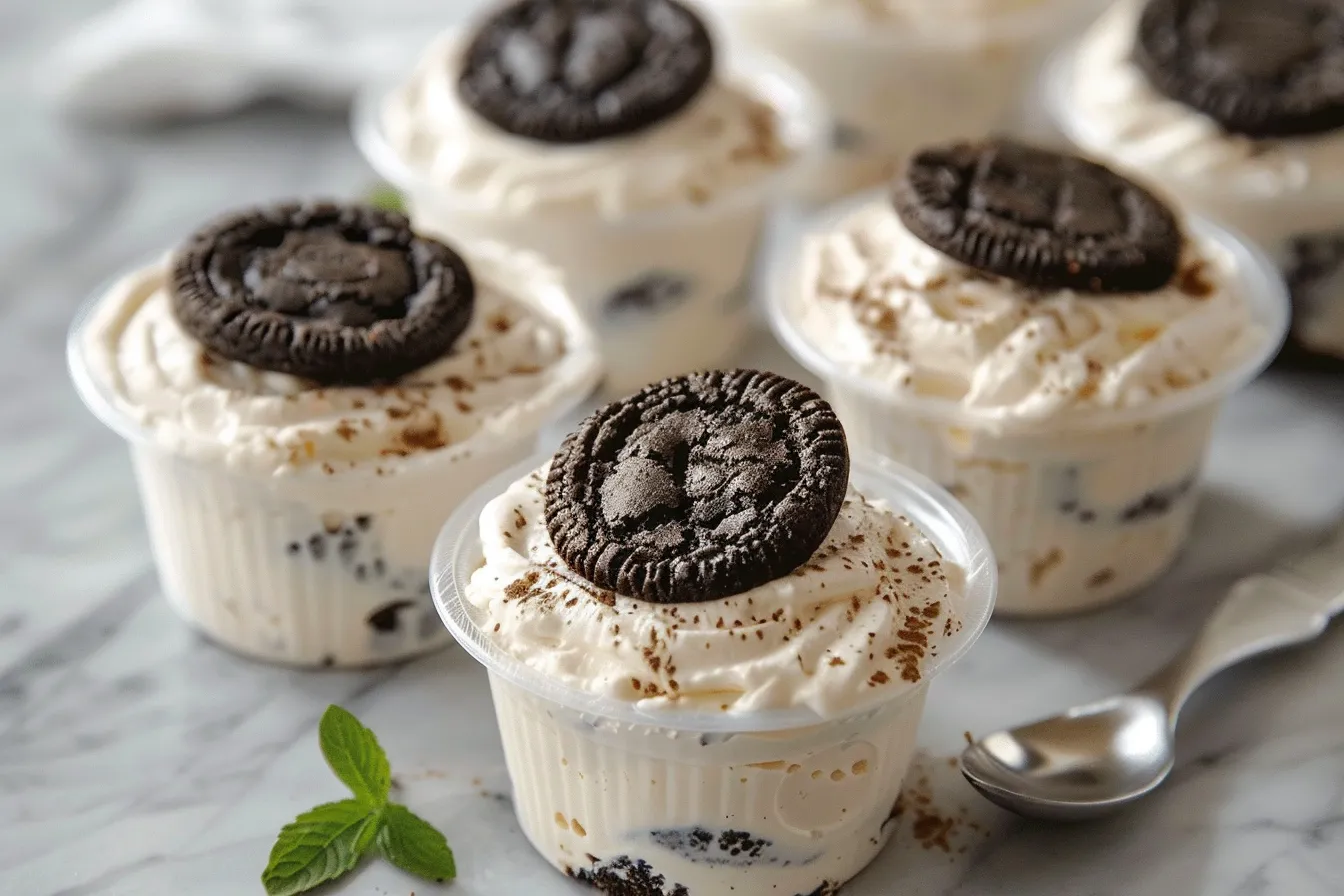
Oh, these No-Bake Cookies and Cream Dessert Cups are a real winner in our house. I’ve been whipping them up for school fetes and birthday parties for what feels like forever, and they’re always the first to disappear! Honestly, the idea came to me after one particularly stressful school run when I needed a quick treat for the kids (and myself!). It had to be easy, no-fuss, and, of course, utterly delicious. After countless attempts to get the biscuit-to-cream ratio just right, I finally nailed it. My two little critics, George and Amelia, give it a resounding thumbs up every time. This recipe is your ticket to a delightful, simple dessert that’s guaranteed to bring smiles all around – no oven required!
Why This Recipe Works
As a mum of two with over eight years of experience in the kitchen, I know how important it is to have recipes that are both delicious and practical. These No-Bake Cookies and Cream Dessert Cups tick all the boxes. They are:
- Straightforward Method: Minimal steps and no baking mean these are ready in a flash. Perfect for when you’re short on time.
- Child-Approved: What child doesn’t love biscuits and cream? It’s a classic combination they adore.
- Budget-Friendly: Uses everyday ingredients you likely already have in your cupboard.
The biggest challenge, really, was stopping the children from sneaking too many biscuits whilst I was trying to assemble them! But a little distraction usually does the trick.
Ingredients
- 200g Oreo cookies (or similar chocolate sandwich biscuits)
- 50g unsalted butter, melted
- 300ml double cream
- 100g icing sugar, sifted
- 1 tsp vanilla extract
- Optional: Extra crushed Oreo cookies for topping
Ingredient Notes
Here’s a little breakdown of why each ingredient is important, and some tips for substitutions if you need them:
- Oreo Cookies: The star of the show! I find Oreos give the best flavour, but any similar chocolate sandwich biscuit will work. Supermarket own brands are a brilliant, budget-friendly option.
- Unsalted Butter: Used to bind the biscuit base. Make sure it’s properly melted for a good, even texture. You can use salted butter in a pinch, but omit a tiny pinch of salt from the cream filling to balance it out.
- Double Cream: Absolutely essential for that rich, creamy filling. Single cream won’t whip up properly, so stick with double.
- Icing Sugar: Sift it to avoid any lumps in your filling. Granulated sugar will make the filling gritty.
- Vanilla Extract: Adds a lovely warmth and depth of flavour. Don’t skip it! You can find good quality vanilla extract in most supermarkets here in the UK.
Step-by-Step Instructions
Here’s how to make these easy dessert cups, step by step:
- Step 1: Crush the Cookies. Place the Oreo cookies in a food processor and pulse until they are finely crushed. If you don’t have a food processor, pop them in a ziplock bag and bash them with a rolling pin – therapeutic and effective!
- Step 2: Make the Biscuit Base. In a bowl, mix the crushed cookies with the melted butter until well combined. The mixture should resemble damp sand.
- Step 3: Press into Cups. Spoon the cookie mixture into the bottom of your dessert cups (or small glasses). Press down firmly to create a compact base. I use the back of a spoon to get a nice even layer.
- Step 4: Prepare the Cream Filling. In a large bowl, whip the double cream with the icing sugar and vanilla extract until soft peaks form. Be careful not to overwhip, or you’ll end up with butter!
- Step 5: Fill the Cups. Spoon the whipped cream mixture on top of the biscuit base in each cup. Smooth the top with a spatula or the back of a spoon.
- Step 6: Chill. Cover the cups with cling film and refrigerate for at least 2 hours to allow the filling to set. This is important – it helps the flavours meld together and stops the cream from being too runny.
- Step 7: Garnish (Optional). Before serving, sprinkle some extra crushed Oreo cookies on top for a bit of added crunch and visual appeal.
My Kitchen Tips & Tricks
Here are a few tried-and-true tips to make these dessert cups even easier and tastier:
- Troubleshooting: If your biscuit base is too crumbly, add a little more melted butter, a teaspoon at a time, until it holds together.
- Time-Saving Shortcut: Use pre-crushed biscuits to save a few minutes – perfect when you’re really in a rush.
- Texture Tip: For a smoother filling, make sure your icing sugar is very finely sifted. Lumps can be a bit unpleasant.
- Child-Friendly Adjustment: My children love it when I add a few mini chocolate chips into the cream filling. It’s a fun little surprise!
- Make-Ahead Strategy: These dessert cups can be made a day in advance. Just store them covered in the fridge.
- Budget-Conscious Tip: Supermarket own-brand chocolate sandwich biscuits work just as well as Oreos and are much kinder on the wallet.
- Freezing: While I haven’t tried freezing the completed cups, the biscuit base can be made ahead of time and frozen until needed. Just thaw it completely before adding the cream filling.
Storage & Meal Prep
These dessert cups are best stored in the fridge. Here’s what you need to know:
- Storage: Keep the dessert cups covered in the fridge to prevent the cream from absorbing any unwanted odours.
- Shelf Life: They will last for up to 3 days in the fridge. After that, the biscuit base might start to soften.
- Reheating: These are best served cold, so no reheating required!
- Make-Ahead: You can easily make these a day ahead. In fact, I often find they taste even better after they’ve had a chance to chill overnight.
- Batch Cooking: This recipe is easy to scale up if you need to make a larger batch for a party or gathering. Just double or triple the ingredients as needed.
Substitutions & Variations
Fancy putting your own spin on these? Here are a few ideas:
- Gluten-Free: Use gluten-free chocolate sandwich biscuits for a gluten-free version. Just make sure the biscuit crumbs are fine enough.
- Dairy-Free: I haven’t personally tried this with dairy-free cream alternatives, but a thick coconut cream (the solid part from a chilled can) might work well. Let me know if you give it a go!
- Seasonal Variations: In the summer, try adding some fresh berries to the cream filling for a fruity twist. In the winter, a sprinkle of cinnamon or nutmeg adds a lovely festive warmth.
- Ingredient Swaps: Instead of vanilla extract, try a little almond extract for a slightly different flavour profile.
Frequently Asked Questions
Can I prepare this the night before?
Absolutely! These are perfect to make the night before. In fact, the flavours meld together even better after a night in the fridge. Just make sure to cover them well to prevent them from drying out or absorbing any fridge odours.
How do I know when the cream filling is ready?
You’re looking for soft peaks to form when you whip the cream. This means the cream will hold its shape briefly but the tips will still curl over. Be careful not to overwhip, or it will become grainy.
Can I use a different type of biscuit?
Yes, of course! While Oreos are the classic choice, any similar chocolate sandwich biscuit will work well. Digestives or even shortbread biscuits could be used for a totally different flavour profile.
How should I store the leftover dessert cups?
Store any leftover dessert cups covered in the fridge. They’ll keep for up to 3 days, but they’re usually devoured long before then in our house!
Do children typically enjoy this recipe?
Oh, absolutely! This is a huge hit with kids of all ages. The combination of biscuits and cream is irresistible. My two are always begging me to make these for their birthday parties.
Can I make this recipe for a large group?
Yes, this recipe is easily scalable. Simply double or triple the ingredients to make a larger batch. You can assemble the cups in individual glasses or use a large trifle dish for a show-stopping centrepiece.
What can I add to the base if I want a nutty flavour?
If you like a nutty flavour, add a tablespoon or two of ground almonds or chopped hazelnuts to the crushed biscuit base. It adds a lovely texture and flavour dimension. Be mindful of any allergies!
Serving Suggestions
These No-Bake Cookies and Cream Dessert Cups are perfect on their own, but here are a few serving suggestions to elevate them even further:
- Pairing: Serve with a cup of tea or coffee for a delightful afternoon treat.
- Presentation: A simple sprig of mint or a dusting of cocoa powder adds a touch of elegance.
- Portion Guidance: One or two dessert cups per person is usually plenty. They’re quite rich!
- Family Favourites: My family loves these served alongside a bowl of fresh fruit salad. It’s a nice balance of indulgence and healthiness.
And there you have it – a delightfully simple, no-bake dessert that’s sure to become a family favourite. It fits so beautifully into our busy lives, providing a bit of sweetness without all the fuss. From rainy afternoons to last-minute birthday treats, these No-Bake Cookies and Cream Dessert Cups have never let us down. Do give it a whirl and let me know what you think in the comments. I always love hearing how you’ve adapted the recipe to suit your own family’s tastes. And don’t forget to pop over to FamiliesRecipes.com for more delicious and easy meal ideas!
PrintCookies Cream Dessert Cups
Easy nobake dessert cups recipe Irresistible cookies cream treat Quick prep perfect for any occasion Get the recipe now dessert 144 chars
- Prep Time: 0 hours 20 minutes
- Cook Time: 0 hours 0 minutes
- Total Time: 2 hours 20 minutes
- Yield: 6
- Category: Dessert
- Method: No-Bake
- Cuisine: American
Ingredients
- 200g Oreo cookies (or similar chocolate sandwich biscuits)
- 50g unsalted butter, melted
- 300ml double cream
- 100g icing sugar, sifted
- 1 tsp vanilla extract
- Optional: Extra crushed Oreo cookies for topping
Instructions
- Place the Oreo cookies in a food processor and pulse until they are finely crushed. If you don’t have a food processor, pop them in a ziplock bag and bash them with a rolling pin – therapeutic and effective!
- In a bowl, mix the crushed cookies with the melted butter until well combined. The mixture should resemble damp sand.
- Spoon the cookie mixture into the bottom of your dessert cups (or small glasses). Press down firmly to create a compact base. I use the back of a spoon to get a nice even layer.
- In a large bowl, whip the double cream with the icing sugar and vanilla extract until soft peaks form. Be careful not to overwhip, or you’ll end up with butter!
- Spoon the whipped cream mixture on top of the biscuit base in each cup. Smooth the top with a spatula or the back of a spoon.
- Cover the cups with cling film and refrigerate for at least 2 hours to allow the filling to set. This is important – it helps the flavours meld together and stops the cream from being too runny.
- Before serving, sprinkle some extra crushed Oreo cookies on top for a bit of added crunch and visual appeal.