
The other day, a particularly grey Tuesday to be exact, the kids were moping about after school, complaining of boredom. Rainy days and fidgety little ones…a classic English scene, isn’t it? I knew I needed a quick and easy win to lift their spirits. That’s when I remembered these chocolate peppermint pretzels. They’re such a simple treat, and even better, the kids can get involved in making them. After countless attempts with various brands of chocolate, I’ve perfected the recipe so the chocolate melts smoothly every time. These festive treats are ready in minutes and always bring smiles. Promise!
Why This Recipe Works
I’ve been making these chocolate peppermint pretzels for years, and they’re a guaranteed crowd-pleaser. They’re perfect for busy families because they’re:
- Quick & Easy: Ready in under 30 minutes, start to finish.
- Child-Approved: My two (brutally honest!) children adore them, and they’re great fun to make together.
- Budget-Friendly: Uses simple, readily available ingredients from any UK supermarket.
Now, I’ll be honest, sometimes the chocolate can be a bit temperamental. But fear not! I’ve got all the tips and tricks to ensure smooth, glossy chocolate every single time.
Ingredients
- 200g milk chocolate, broken into pieces
- 1 tbsp vegetable shortening (like Trex)
- 100g mini pretzel twists
- 2 tbsp crushed peppermint candy canes
Ingredient Notes
Milk Chocolate: I prefer using Cadbury Dairy Milk for its smooth melting quality and classic flavour, but any good quality milk chocolate will do. Avoid chocolate with added fillings, as they don’t melt as well.
Vegetable Shortening: This is my secret ingredient! Adding a little vegetable shortening helps the chocolate melt smoothly and gives it a lovely glossy finish. Don’t skip it! If you don’t have shortening, you can use coconut oil, but the taste will be slightly different.
Mini Pretzel Twists: These are readily available in most UK supermarkets. Make sure they’re fresh for the best crunch.
Crushed Peppermint Candy Canes: You can find these in most supermarkets around Christmas time. If you can’t find pre-crushed, simply pop a few candy canes into a zip-lock bag and bash them with a rolling pin. The kids love helping with this part!
Step-by-Step Instructions
Step 1: Melt the Chocolate. Place the chocolate pieces and vegetable shortening in a heatproof bowl set over a pan of gently simmering water (make sure the bottom of the bowl doesn’t touch the water). Stir frequently until the chocolate is completely melted and smooth. This usually takes about 5-7 minutes. Be patient and don’t rush it, as burnt chocolate is no fun for anyone!
Step 2: Dip the Pretzels. One at a time, dip each pretzel twist into the melted chocolate, ensuring it’s fully coated. Use a fork to lift the pretzel out and gently tap off any excess chocolate. My children prefer a thick coat of chocolate but I think a light dusting is perfect.
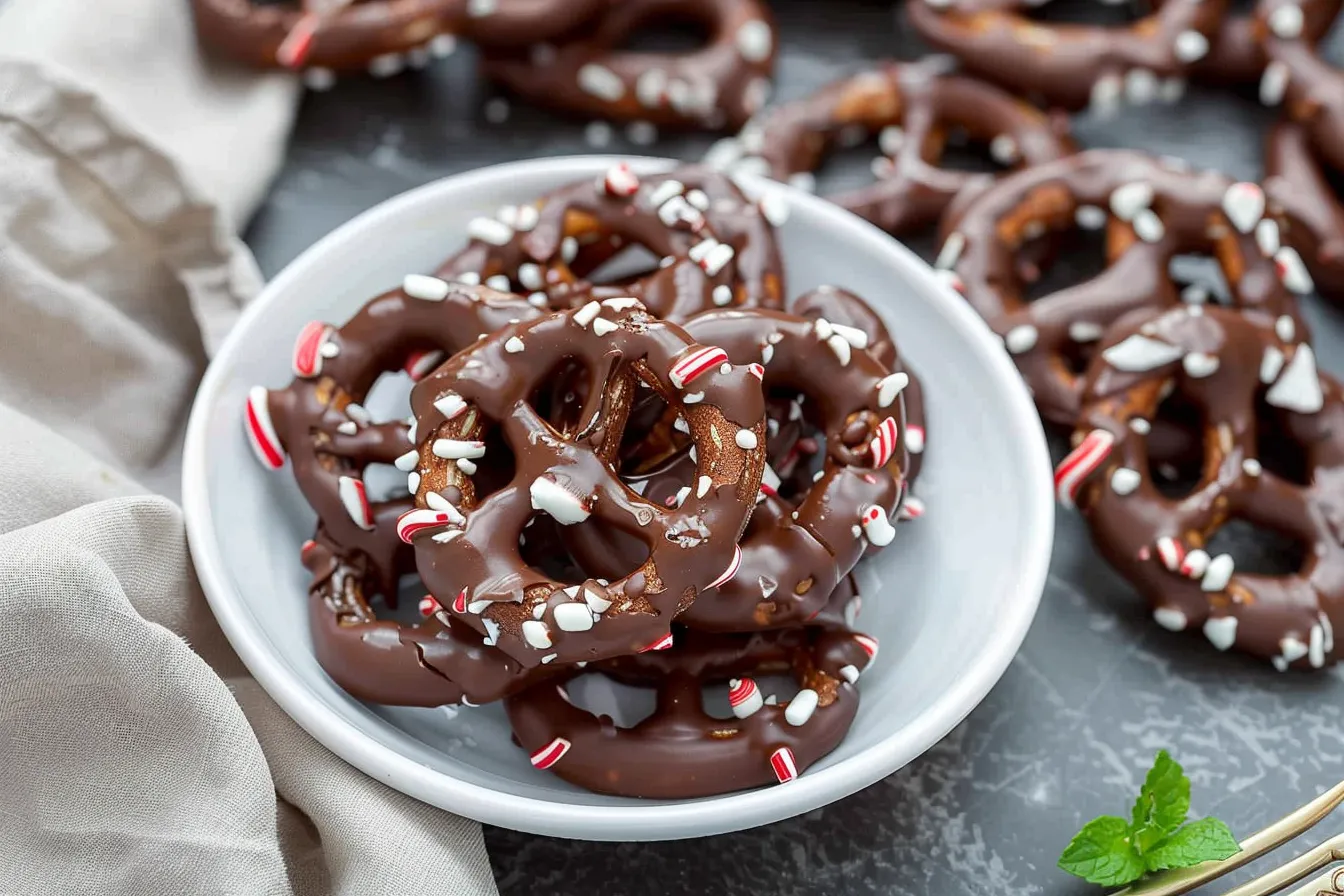
Step 3: Add the Peppermint. Immediately sprinkle the crushed peppermint candy canes over the chocolate-covered pretzels before the chocolate sets. This is where the magic happens! The peppermint adds a lovely festive touch and a refreshing flavour.
Step 4: Set the Pretzels. Place the decorated pretzels on a baking sheet lined with parchment paper. Allow them to set completely at room temperature, or pop them in the fridge for about 15-20 minutes to speed up the process. I’ve learned that the fridge is the best option to prevent the peppermint from melting into the chocolate.
Step 5: Enjoy! Once the chocolate is set, carefully peel the pretzels off the parchment paper and enjoy! These are best enjoyed within a few days.
My Kitchen Tips & Tricks
- Smooth Chocolate is Key: Make sure the chocolate is completely melted and smooth before dipping. If it’s lumpy, it won’t coat the pretzels properly. Adding that little bit of vegetable shortening really does help!
- Prevent Peppermint Melt: If the peppermint melts into the chocolate, that’s a sign the chocolate is too warm! Allow the pretzels to completely set in the fridge to prevent it.
- Time-Saving Shortcut: Use ready-crushed peppermint candy canes to save time. You can find these in most supermarkets during the festive season.
- Child-Friendly Adjustment: Let the kids choose their own toppings! Sprinkles, chopped nuts, or even a drizzle of white chocolate can be fun additions.
- Make-Ahead Strategy: These pretzels can be made a day or two in advance. Store them in an airtight container at room temperature.
- Budget-Conscious Tip: Shop around for the best price on chocolate. Supermarket own-brand chocolate can work just as well as the more expensive brands.
- Texture Perfection: If you prefer a thinner chocolate coating, dip the pretzels quickly and tap off as much excess chocolate as possible. For a thicker coating, dip them twice!
Storage & Meal Prep
These chocolate peppermint pretzels are best stored in an airtight container at room temperature. They’ll stay fresh for up to 3-4 days. I wouldn’t recommend storing them in the fridge for too long, as the chocolate can sometimes develop a white bloom (although they’re still perfectly safe to eat!).
They’re not ideal for freezing, as the chocolate can become a bit grainy after thawing. However, you can easily make these a day or two in advance, which is perfect for busy weeknights or festive gatherings.
Substitutions & Variations
Want to mix things up a bit? Here are a few substitutions and variations you can try:
- Dark Chocolate: Use dark chocolate instead of milk chocolate for a richer, more intense flavour. My husband actually prefers them that way!
- White Chocolate: Swap the milk chocolate for white chocolate for a sweeter treat. Drizzle with dark chocolate for a pretty contrast.
- Gluten-Free: Use gluten-free pretzels for a gluten-free option.
- Dairy-Free: Use dairy-free chocolate and ensure your vegetable shortening is also dairy-free.
- Seasonal Variations: Use different toppings to match the season! Sprinkles for birthdays, chopped nuts for autumn, or mini chocolate chips for extra indulgence.
I haven’t personally tried using sugar-free chocolate, but I imagine it would work just as well. Just be sure to check the ingredients list carefully to ensure it melts smoothly.

Frequently Asked Questions
Can I prepare this the night before?
Absolutely. In fact, I often do this on Sunday evenings before the busy school week. Simply prepare everything up to the setting stage, cover tightly, and leave to set at room temperature. In the warmer months, I’d recommend popping them in the fridge.
How do I tell when they are done?
You’ll know the chocolate peppermint pretzels are done when the chocolate is completely set and firm to the touch. They should easily peel off the parchment paper without sticking.
Can I use a different type of chocolate?
Yes, absolutely! Milk, dark, or white chocolate all work well in this recipe. Just be sure to use a good quality chocolate that melts smoothly.
How should I store the leftovers?
Store any leftover chocolate peppermint pretzels in an airtight container at room temperature. They’ll stay fresh for up to 3-4 days.
Will my children enjoy this recipe?
In my experience, most children absolutely love this recipe! It’s fun, festive, and who doesn’t love chocolate and peppermint? Just be prepared for a bit of mess!
Can I make a bigger batch?
Yes, you can easily scale up this recipe to make a larger batch. Simply double or triple the ingredients as needed.
What if my chocolate seizes up?
Oh dear! This can happen sometimes. If your chocolate seizes up, try adding a teaspoon of vegetable oil or shortening and stirring vigorously. Sometimes this can help to bring it back to a smooth consistency.
Serving Suggestions
These chocolate peppermint pretzels are perfect on their own as a sweet treat, but they also pair well with:
- A steaming mug of hot chocolate
- A glass of cold milk
- As part of a festive dessert platter
- Wrapped in cellophane bags as homemade gifts
For presentation, simply arrange the pretzels on a pretty plate or in a decorative bowl. A little goes a long way! For family portions, I usually allow 2-3 pretzels per person, but let’s be honest, they rarely last that long!
So there you have it my go-to recipe for chocolate peppermint pretzels. It’s a simple, fuss-free way to bring a little bit of festive cheer into your home, even on the greyest of days. And more importantly, it’s a recipe that the whole family can enjoy making and eating together.
PrintChocolate Peppermint Pretzels Recipe

Easy choc peppermint pretzels recipe Quick dessert Festive peppermint snack Perfect simple tech to elevate holiday parties
143 chars
- Prep Time: 10 minutes
- Cook Time: 10 minutes
- Total Time: 20 minutes
- Yield: Approximately 30 pretzels
- Category: Dessert
- Cuisine: British
Ingredients
- 200g milk chocolate, broken into pieces
- 1 tbsp vegetable shortening (like Trex)
- 100g mini pretzel twists
- 2 tbsp crushed peppermint candy canes
Instructions
- Melt the Chocolate. Place the chocolate pieces and vegetable shortening in a heatproof bowl set over a pan of gently simmering water (make sure the bottom of the bowl doesn’t touch the water). Stir frequently until the chocolate is completely melted and smooth. This usually takes about 5-7 minutes. Be patient and don’t rush it, as burnt chocolate is no fun for anyone!
- Dip the Pretzels. One at a time, dip each pretzel twist into the melted chocolate, ensuring it’s fully coated. Use a fork to lift the pretzel out and gently tap off any excess chocolate.
- Add the Peppermint. Immediately sprinkle the crushed peppermint candy canes over the chocolate-covered pretzels before the chocolate sets.
- Set the Pretzels. Place the decorated pretzels on a baking sheet lined with parchment paper. Allow them to set completely at room temperature, or pop them in the fridge for about 15-20 minutes to speed up the process.
- Enjoy! Once the chocolate is set, carefully peel the pretzels off the parchment paper and enjoy! These are best enjoyed within a few days.
Notes
Easy Chocolate Peppermint Pretzels recipe perfect for UK families! Quick, kid-friendly & festive. Learn my secret for perfectly smooth chocolate!