
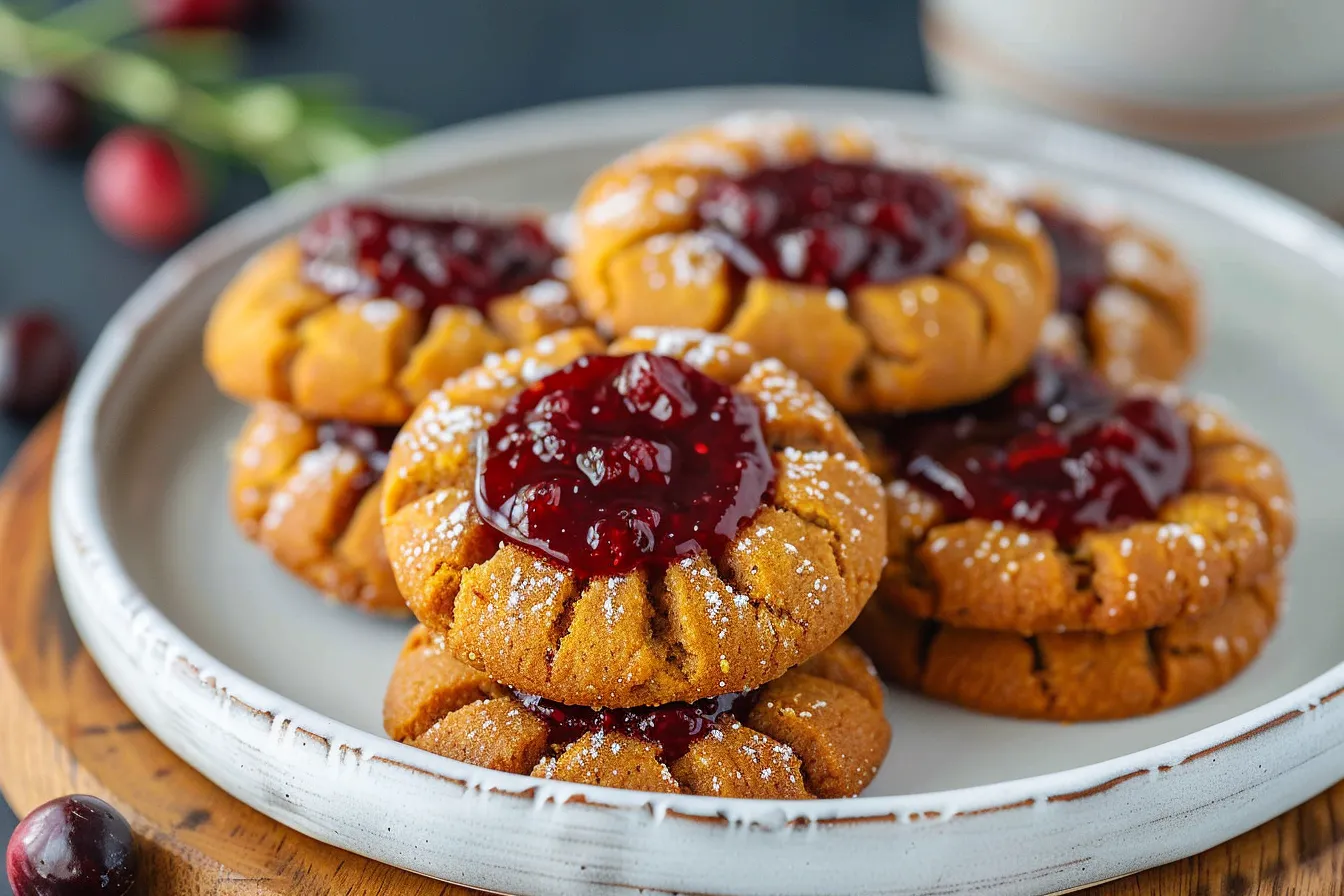
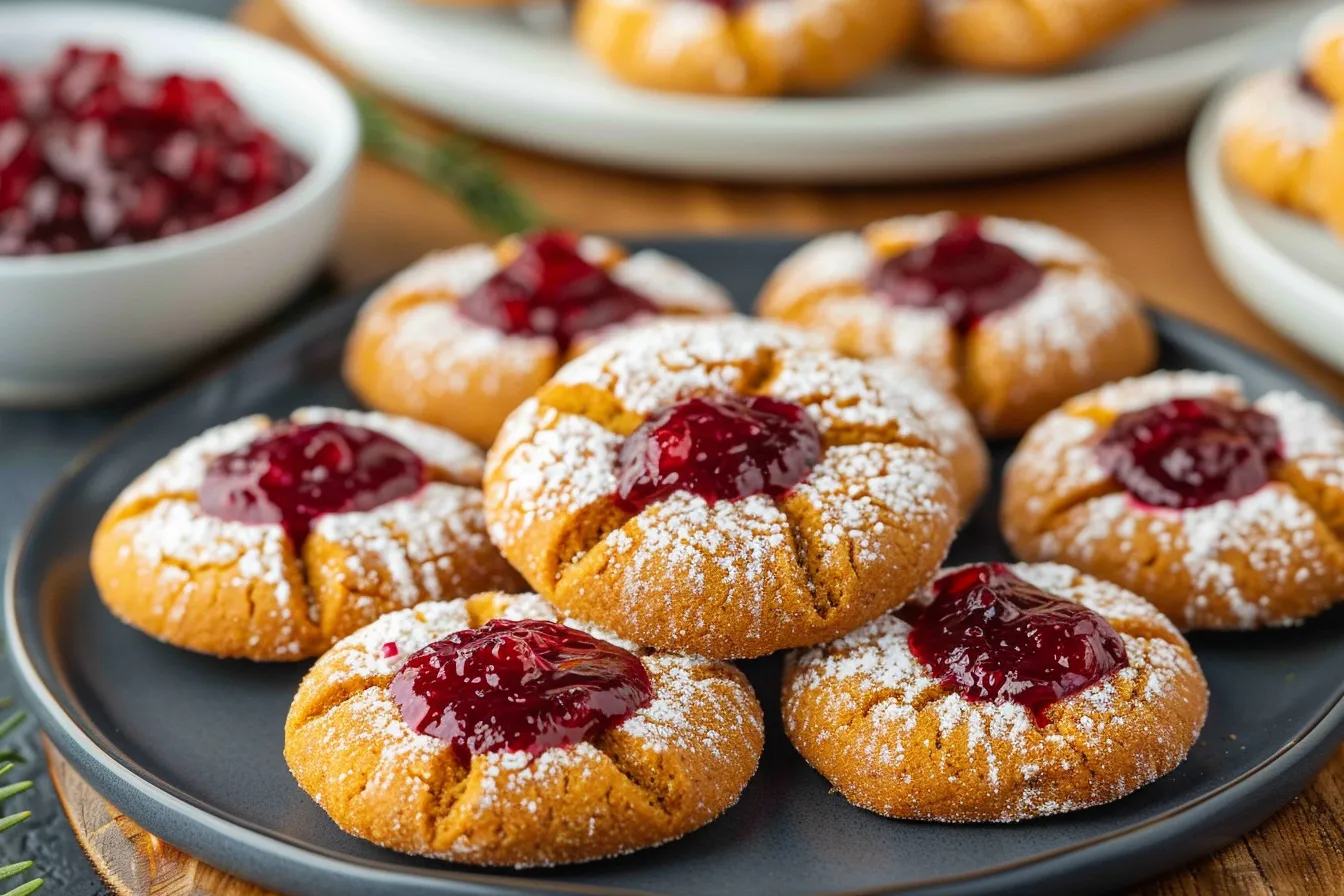
There’s nothing quite like the smell of gingerbread baking to fill a home with warmth and festive cheer, is there? These Gingerbread Thumbprint Cookies with Cranberry Sauce have become a real favourite in our house, especially around the holidays. After countless attempts to get the perfect balance of spice, chewiness, and festive flavour, I’ve finally cracked it. My two little ones, bless them, are my harshest critics, but they give these cookies two enthusiastic thumbs up every time. I promise you, these are the sort of cookies that will become a cherished family tradition, and you’ll have the satisfaction of knowing you made them yourself, with love (and maybe a little bit of flour dusting your apron!).
Why This Recipe Works
As a busy mum of two, I know how precious time is. That’s why I’ve developed this recipe to be both delicious and achievable, even on the busiest of days. I’ve been tweaking this recipe for over eight years, and here’s why it works so brilliantly:
- Straightforward Method: The steps are simple and clearly explained, so even beginner bakers can achieve success.
- Child-Approved: Let’s be honest, if the kids don’t like it, what’s the point? These cookies get a resounding thumbs up from even the fussiest eaters.
- Festive Twist: The cranberry sauce adds a delightful tang that perfectly complements the warm spices of gingerbread, making them ideal for the Christmas season (or any time of year, really!).
Ingredients
- 225g unsalted butter, softened
- 150g light brown sugar, packed
- 75g granulated sugar
- 1 large egg
- 1 teaspoon vanilla extract
- 350g all-purpose flour, plus extra for dusting
- 1 teaspoon baking soda
- 1 teaspoon ground ginger
- 1 teaspoon ground cinnamon
- ½ teaspoon ground cloves
- ¼ teaspoon ground nutmeg
- ¼ teaspoon salt
- 150g cranberry sauce (store-bought or homemade)
Ingredient Notes
A few little notes on the ingredients to help you get the best results:
- Unsalted Butter: I always use unsalted butter in baking so I can control the amount of salt. Make sure it’s properly softened, but not melted, for the best cookie texture.
- Light Brown Sugar: This adds moisture and a lovely caramel flavour. If you only have dark brown sugar, that will work too, but your cookies will be slightly darker and more intensely flavoured.
- Spices: Don’t skimp on the spices! They’re what give these cookies their signature gingerbread flavour. Make sure your spices are fresh for the best aroma and taste. You can typically find all of them in the baking aisle of any major UK supermarket.
- Cranberry Sauce: Both store-bought and homemade cranberry sauce will work well. If you’re using store-bought, choose a smooth variety without whole berries for easier filling. If using homemade, blend it slightly for a smoother consistency. A budget friendly alternative to cranberry sauce would be to use a simple raspberry jam.
Step-by-Step Instructions
Step 1: Cream the Butter and Sugars. In a large bowl, cream together the softened butter, light brown sugar, and granulated sugar until light and fluffy. This usually takes about 3-5 minutes with an electric mixer. You want a pale, creamy mixture as this is what gives the cookies a nice, tender crumb.
Step 2: Add the Egg and Vanilla. Beat in the egg and vanilla extract until well combined. Make sure to scrape down the sides of the bowl to ensure everything is evenly mixed.
Step 3: Combine the Dry Ingredients. In a separate bowl, whisk together the flour, baking soda, ginger, cinnamon, cloves, nutmeg, and salt. This ensures the spices are evenly distributed throughout the flour.
Step 4: Gradually Add Dry Ingredients to Wet Ingredients. Gradually add the dry ingredients to the wet ingredients, mixing on low speed until just combined. Be careful not to overmix, as this can result in tough cookies. The dough should be soft but not sticky. If it’s too sticky, add a tablespoon of flour at a time until it comes together.
Step 5: Chill the Dough. Wrap the dough in cling film and chill in the refrigerator for at least 30 minutes. This helps to prevent the cookies from spreading too much during baking. I’ve found that an hour is even better for a slightly more controlled shape.
Step 6: Preheat Oven and Prepare Baking Sheets. Preheat your oven to 175°C (155°C fan/Gas Mark 3). Line baking sheets with parchment paper. This prevents the cookies from sticking and makes clean-up a breeze.
Step 7: Shape the Cookies. Roll the dough into 1-inch balls and place them on the prepared baking sheets, leaving about 2 inches between each cookie. I like to use a small ice cream scoop to ensure they are all the same size.
Step 8: Make the Thumbprints. Use your thumb (or the back of a small spoon) to gently press an indentation into the centre of each cookie. My children prefer using the back of a small spoon as it’s less messy and creates a perfectly round indentation.
Step 9: Fill with Cranberry Sauce. Fill each thumbprint with about ½ teaspoon of cranberry sauce. Don’t overfill, or the sauce may bubble over during baking.
Step 10: Bake. Bake for 10-12 minutes, or until the edges are lightly golden brown. Keep a close eye on them, as baking times can vary depending on your oven. You want them to be set but still slightly soft in the centre.
Step 11: Cool and Enjoy. Let the cookies cool on the baking sheets for a few minutes before transferring them to a wire rack to cool completely. This helps prevent them from breaking.
My Kitchen Tips & Tricks
Here are a few tips and tricks I’ve learned over the years to make these cookies even more foolproof:
- Soft Butter is Key: Make sure your butter is properly softened before creaming it with the sugars. This will result in a lighter, more tender cookie.
- Don’t Overmix: Overmixing the dough can develop the gluten in the flour, resulting in tough cookies. Mix until just combined.
- Chill the Dough: Chilling the dough is essential for preventing the cookies from spreading too much during baking. Don’t skip this step!
- Perfect Thumbprints: For neat, even thumbprints, try using the back of a small spoon instead of your thumb.
- Prevent Burning: If the cranberry sauce starts to bubble too much during baking, you can tent the baking sheet with foil to prevent the cookies from burning.
- Make Ahead: The dough can be made ahead of time and stored in the refrigerator for up to 2 days.
- Kid-Friendly Fun: Get your kids involved in the baking process! They can help with measuring ingredients, rolling the dough into balls, and making the thumbprints.
Storage & Meal Prep
These cookies are best stored in an airtight container at room temperature. They will stay fresh for up to 3-4 days. I’ve found the flavour actually deepens after a day or two!
For longer storage, you can freeze the baked cookies in an airtight container for up to 2 months. Let them thaw completely at room temperature before serving.
You can also freeze the unbaked dough. Simply shape the dough into a disc, wrap it tightly in cling film, and freeze for up to 3 months. Thaw in the refrigerator overnight before baking.
Substitutions & Variations
Here are a few ideas for substitutions and variations to suit different dietary needs and preferences:
- Gluten-Free: You can substitute a gluten-free all-purpose flour blend for the regular flour. I’ve used a rice flour based blend with good results, but the texture might be slightly different.
- Dairy-Free: Use a dairy-free butter substitute in place of the butter.
- Nut-Free: This recipe is naturally nut-free, but always check the labels of your ingredients to ensure they are processed in a nut-free facility.
- Jam Thumbprints: If you don’t have cranberry sauce, you can use other jams, such as raspberry, apricot, or strawberry. My family prefer raspberry.
- Spice it Up: Add a pinch of cayenne pepper to the dough for a spicy gingerbread kick.
- Citrus Zest: Add the zest of an orange or lemon to the dough for a bright, festive flavour.
Frequently Asked Questions
Can I prepare this the night before?
Absolutely. In fact, I often do this on Sunday evenings before the busy school week. Simply prepare everything up to the baking stage, cover tightly, and refrigerate. Bring it to room temperature for 15 minutes before cooking, and you’ll save yourself precious morning time.
How do I know when the cookies are done?
The cookies are done when the edges are lightly golden brown and the centres are set but still slightly soft to the touch. Keep a close eye on them, as baking times can vary depending on your oven.
Can I use different types of jam instead of cranberry sauce?
Yes, you can! Raspberry, apricot, or strawberry jam are all great alternatives. Just make sure the jam is relatively smooth so it doesn’t bubble over too much during baking.
How should I store the leftover cookies?
Store the cookies in an airtight container at room temperature for up to 3-4 days. They can also be frozen for longer storage.
Do children usually enjoy these cookies?
My children absolutely love them! The combination of gingerbread spice and sweet-tart cranberry sauce is a real winner. Plus, they love helping to make them.
Can I double or triple the recipe for a larger gathering?
Yes, you can easily double or triple the recipe to make a larger batch of cookies. Just make sure to adjust the baking time accordingly.
What can I do if my cookie dough is too sticky?
If your cookie dough is too sticky, add a tablespoon of flour at a time until it comes together. Be careful not to add too much flour, as this can result in dry cookies.
Serving Suggestions
These Gingerbread Thumbprint Cookies with Cranberry Sauce are perfect on their own with a cup of tea or coffee. They also make a lovely addition to a holiday dessert platter. For a simple presentation, arrange the cookies on a pretty plate and dust with powdered sugar. My family often enjoys them alongside a glass of cold milk or a scoop of vanilla ice cream. I usually allow 2-3 cookies per person as a light treat.
These cookies are also brilliant for gifting. Put them in a pretty tin or a cellophane bag tied with a ribbon for a thoughtful homemade gift. They’re guaranteed to bring a smile to anyone’s face.
Baking these Gingerbread Thumbprint Cookies with Cranberry Sauce isn’t just about creating a delicious treat; it’s about creating memories. These are the kinds of smells and tastes that become woven into the fabric of family life, reminding us of cozy afternoons spent together in the kitchen. I truly hope you give this recipe a try and share your honest feedback in the comments. And if you’re looking for more easy and delicious family recipes, be sure to browse the rest of FamiliesRecipes.com or join our email community for weekly inspiration. Happy baking!
PrintCranberry Gingerbread Thumbprint Cookies Recipe

Festive cookies Cranberry gingerbread thumbprint recipe is simple delicious Make holiday baking easy w this techniquetech 142 chars
- Prep Time: 30 minutes
- Cook Time: 12 minutes
- Total Time: 42 minutes
- Yield: Approximately 24 cookies
- Category: Cookie
- Cuisine: British
Ingredients
- 225 grams unsalted butter, softened
- 150 grams light brown sugar, packed
- 75 grams granulated sugar
- 1 large egg
- 1 teaspoon vanilla extract
- 350 grams all-purpose flour, plus extra for dusting
- 1 teaspoon baking soda
- 1 teaspoon ground ginger
- 1 teaspoon ground cinnamon
- ½ teaspoon ground cloves
- ¼ teaspoon ground nutmeg
- ¼ teaspoon salt
- 150 grams cranberry sauce (store-bought or homemade)
Instructions
- Cream the Butter and Sugars. In a large bowl, cream together the softened butter, light brown sugar, and granulated sugar until light and fluffy. This usually takes about 3-5 minutes with an electric mixer. You want a pale, creamy mixture as this is what gives the cookies a nice, tender crumb.
- Add the Egg and Vanilla. Beat in the egg and vanilla extract until well combined. Make sure to scrape down the sides of the bowl to ensure everything is evenly mixed.
- Combine the Dry Ingredients. In a separate bowl, whisk together the flour, baking soda, ginger, cinnamon, cloves, nutmeg, and salt. This ensures the spices are evenly distributed throughout the flour.
- Gradually Add Dry Ingredients to Wet Ingredients. Gradually add the dry ingredients to the wet ingredients, mixing on low speed until just combined. Be careful not to overmix, as this can result in tough cookies. The dough should be soft but not sticky. If it’s too sticky, add a tablespoon of flour at a time until it comes together.
- Chill the Dough. Wrap the dough in cling film and chill in the refrigerator for at least 30 minutes. This helps to prevent the cookies from spreading too much during baking. I’ve found that an hour is even better for a slightly more controlled shape.
- Preheat Oven and Prepare Baking Sheets. Preheat your oven to 175°C (155°C fan/Gas Mark 3). Line baking sheets with parchment paper. This prevents the cookies from sticking and makes clean-up a breeze.
- Shape the Cookies. Roll the dough into 1-inch balls and place them on the prepared baking sheets, leaving about 2 inches between each cookie. I like to use a small ice cream scoop to ensure they are all the same size.
- Make the Thumbprints. Use your thumb (or the back of a small spoon) to gently press an indentation into the centre of each cookie. My children prefer using the back of a small spoon as it’s less messy and creates a perfectly round indentation.
- Fill with Cranberry Sauce. Fill each thumbprint with about ½ teaspoon of cranberry sauce. Don’t overfill, or the sauce may bubble over during baking.
- Bake. Bake for 10-12 minutes, or until the edges are lightly golden brown. Keep a close eye on them, as baking times can vary depending on your oven. You want them to be set but still slightly soft in the centre.
- Cool and Enjoy. Let the cookies cool on the baking sheets for a few minutes before transferring them to a wire rack to cool completely. This helps prevent them from breaking.
Notes
Festive Gingerbread Thumbprint Cookies with Cranberry Sauce! Easy, family-friendly recipe tested by a mum of two. Perfect for holidays or any day!