
Right then, let’s talk peanut butter cookies. These aren’t just any peanut butter cookies; they’re the kind that vanish within minutes of coming out of the oven. After years of trying different recipes, battling with dry, crumbly biscuits, and getting honest (sometimes brutal!) feedback from my two, I’ve finally cracked it. This recipe delivers chewy, flavour-packed peanut butter cookies every single time. I promise you, they’ll be a new family favourite, perfect for dunking in a cuppa on a rainy afternoon. My youngest, bless him, even requests them for his school lunchbox – though I do have to ration them!

Why This Recipe Works
As a busy mum, I understand the importance of a good, reliable recipe. This peanut butter cookie recipe ticks all the boxes for a quick and easy treat, and here’s why:
- Simple Ingredients: You probably have most of these ingredients in your cupboard already, no need for a special trip to the shops!
- Quick & Easy: From start to finish, you’re looking at about 30 minutes, tops. Perfect for those sudden biscuit cravings.
- Kid-Approved: Believe me, if these weren’t delicious, my two wouldn’t go near them. They are the harshest critics!
Ingredients
- 125g unsalted butter, softened
- 100g granulated sugar
- 100g light brown sugar, packed
- 1 large egg
- 1 tsp vanilla extract
- 200g smooth peanut butter
- 150g plain flour
- 1/2 tsp baking soda
- 1/4 tsp salt
Ingredient Notes
Let’s break down why each ingredient is important and if there are any wiggle-room options:
- Peanut Butter: Smooth peanut butter works best for a consistent texture. You can use crunchy if you prefer, but it will change the cookie’s final feel. Avoid the all-natural kind that separates, as it affects the dough’s consistency.
- Sugars: The combination of granulated and brown sugar is key for that perfect chewy texture. Don’t skip the brown sugar! It adds moisture and a lovely caramel flavour. If you only have dark brown sugar, that will work too, but the cookies will be slightly richer.
- Vanilla Extract: Adds a subtle warmth. If you’re out, a pinch of cinnamon works nicely too.
- Flour: Plain flour is what you want here. If you need a gluten-free version (see substitutions below!), use a gluten-free blend that mimics plain flour.
Step-by-Step Instructions
Right, let’s get cracking! This is how to make these glorious peanut butter cookies:
- Step 1: Cream Together the Butter and Sugars. In a large bowl, cream together the softened butter, granulated sugar, and brown sugar until light and fluffy. This usually takes about 3-5 minutes with an electric mixer. You want it to be pale and almost doubled in volume.
- Step 2: Add the Egg and Vanilla. Beat in the egg and vanilla extract until well combined. Don’t overmix at this stage. Just ensure everything is nicely incorporated.
- Step 3: Stir in the Peanut Butter. Add the peanut butter and mix until smooth. The mixture might look a little thick – that’s perfectly normal.
- Step 4: Combine the Dry Ingredients. In a separate bowl, whisk together the flour, baking soda, and salt. This ensures the baking soda is evenly distributed.
- Step 5: Gradually Add the Dry Ingredients to the Wet Ingredients. Gradually add the dry ingredients to the wet ingredients, mixing until just combined. Be careful not to overmix, as this can result in tough cookies. Stop mixing when you no longer see streaks of flour.
- Step 6: Chill the Dough. Cover the dough and chill in the refrigerator for at least 30 minutes. This is crucial! Chilling prevents the cookies from spreading too thin during baking. I sometimes leave it in for an hour if I’m doing other things.
- Step 7: Preheat the Oven. Preheat your oven to 180°C (160°C fan/Gas Mark 4). Line a baking sheet with parchment paper.
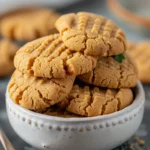
- Step 8: Roll and Shape the Cookies. Roll the dough into 1-inch balls. Place them on the prepared baking sheet, leaving some space between each cookie. Use a fork to flatten each cookie, pressing down in a criss-cross pattern. This not only looks pretty but also helps the cookies bake evenly.
- Step 9: Bake. Bake for 8-10 minutes, or until the edges are golden brown and the centers are set. Keep a close eye on them, as they can burn easily.
- Step 10: Cool. Let the cookies cool on the baking sheet for a few minutes before transferring them to a wire rack to cool completely. This prevents them from breaking. Enjoy!

My Kitchen Tips & Tricks
Over the years, I’ve picked up a few tricks for perfect peanut butter cookies every time. Here are my top tips:
- Don’t skip the chilling! Seriously, it makes a huge difference in preventing overly flat cookies.
- Use a cookie scoop for uniformly sized cookies that bake evenly.
- For extra peanut butter flavour, sprinkle a tiny bit of sea salt on top of each cookie before baking. My son, Tom, adores this!
- If your dough is too sticky to roll, add a tablespoon of flour at a time until it becomes more manageable.
- Watch them carefully in the oven. Peanut butter cookies can go from perfectly baked to burnt in a flash!
- For a softer cookie, slightly underbake them. They’ll continue to set as they cool.
- If your cookies are spreading too much, try adding a tablespoon or two of flour to the dough and chilling it for a little longer.
Storage & Meal Prep
These peanut butter cookies are best enjoyed fresh, but they also store well. Here’s how:
- Storage: Store cooled cookies in an airtight container at room temperature for up to 3-4 days.
- Freezing: For longer storage, you can freeze the baked cookies. Place them in a single layer on a baking sheet, freeze until solid, then transfer to a freezer bag or container. They’ll keep for up to 2 months. Defrost at room temperature before serving.
- Make-Ahead: You can prepare the cookie dough ahead of time and store it in the refrigerator for up to 2 days. Just bring it to room temperature for about 15 minutes before baking.
Substitutions & Variations
Want to mix things up a bit? Here are a few substitutions and variations I’ve tried:
- Gluten-Free: Use a gluten-free all-purpose flour blend. I’ve had good results with the Doves Farm blend. The texture might be slightly different, but they’ll still be delicious.
- Dairy-Free: Use a dairy-free butter alternative. Make sure it’s one that behaves similarly to real butter in baking.
- Chocolate Chip Peanut Butter Cookies: Add 100g of chocolate chips to the dough for a chocolatey twist. My daughter, Emily, is obsessed with this version!
- Different Nut Butters: You could try almond butter or cashew butter for a different flavour profile. I’ve only experimented with almond butter myself, and it worked a treat.
Frequently Asked Questions
Can I prepare this the night before?
Absolutely. In fact, I often do this on Sunday evenings before the busy school week. Simply prepare the dough, cover tightly, and refrigerate. Bring it to room temperature for 15 minutes before cooking, and you’ll save yourself precious morning time.
How do I know when the cookies are done?
The cookies are ready when the edges are golden brown and the centers look set. They’ll still be slightly soft to the touch, but they’ll firm up as they cool. Be careful not to overbake them, or they’ll become dry.
Can I use natural peanut butter?
I wouldn’t recommend it. Natural peanut butter, the kind that separates, can make the cookies greasy and affect the texture. If you do use it, make sure to stir it very well before adding it to the dough.
How should I store leftover cookies?
Store leftover cookies in an airtight container at room temperature. They’ll stay fresh for about 3-4 days. If you live in a humid climate, you might want to store them in the refrigerator to prevent them from becoming too soft.
Can I double or triple the recipe?
Yes, absolutely! This recipe scales up easily. Just make sure to use a large enough bowl and mix everything thoroughly. You might need to bake the cookies in batches.
Do children typically enjoy these cookies?
In my experience, children absolutely love these cookies! The peanut butter flavour is a winner, and the soft, chewy texture is very appealing. However, always be mindful of any peanut allergies.
Why are my cookies flat?
If your cookies are spreading too thin, it could be due to a few factors: the butter might have been too soft, the dough wasn’t chilled enough, or you may have overmixed the dough. Try chilling the dough for longer and ensuring the butter is softened but not melted.
Serving Suggestions
These peanut butter cookies are wonderful on their own, but here are a few serving suggestions:
- Serve them with a glass of cold milk or a cup of tea for a classic pairing.
- Crumble them over ice cream for a delicious dessert topping.
- Pack them in lunchboxes for a sweet treat.
- Make peanut butter cookie ice cream sandwiches – simply sandwich a scoop of vanilla ice cream between two cookies.
I usually make a batch for the kids after their Saturday football practice; they disappear in minutes! These cookies are also brilliant for bake sales and gatherings – they always go down a storm.
So there you have it, my foolproof peanut butter cookie recipe! I really hope you give it a go. It’s a genuinely easy and delicious recipe, and I know your family will love them as much as mine do. Do let me know how they turn out in the comments below – I always love hearing your feedback! And if you’re looking for more family-friendly recipes, be sure to check out the rest of the site, and perhaps even sign up for my newsletter. Happy baking!
PrintPeanut Butter Cookies
Craving best peanut butter cookies Our unbelievably delicious recipe guarantees chewy perfect results every time Bake the best ever cookies today
- Prep Time: 15 minutes
- Cook Time: 10 minutes
- Total Time: 25 minutes
- Yield: 24
- Category: Cookie
- Cuisine: American
Ingredients
- 125g unsalted butter, softened
- 100g granulated sugar
- 100g light brown sugar, packed
- 1 large egg
- 1 tsp vanilla extract
- 200g smooth peanut butter
- 150g plain flour
- 1/2 tsp baking soda
- 1/4 tsp salt
Instructions
- Cream Together the Butter and Sugars. In a large bowl, cream together the softened butter, granulated sugar, and brown sugar until light and fluffy. This usually takes about 3-5 minutes with an electric mixer. You want it to be pale and almost doubled in volume.
- Add the Egg and Vanilla. Beat in the egg and vanilla extract until well combined. Don’t overmix at this stage. Just ensure everything is nicely incorporated.
- Stir in the Peanut Butter. Add the peanut butter and mix until smooth. The mixture might look a little thick – that’s perfectly normal.
- Combine the Dry Ingredients. In a separate bowl, whisk together the flour, baking soda, and salt. This ensures the baking soda is evenly distributed.
- Gradually Add the Dry Ingredients to the Wet Ingredients. Gradually add the dry ingredients to the wet ingredients, mixing until just combined. Be careful not to overmix, as this can result in tough cookies. Stop mixing when you no longer see streaks of flour.
- Chill the Dough. Cover the dough and chill in the refrigerator for at least 30 minutes. This is crucial! Chilling prevents the cookies from spreading too thin during baking. I sometimes leave it in for an hour if I’m doing other things.
- Preheat the Oven. Preheat your oven to 180°C (160°C fan/Gas Mark 4). Line a baking sheet with parchment paper.
- Roll and Shape the Cookies. Roll the dough into 1-inch balls. Place them on the prepared baking sheet, leaving some space between each cookie. Use a fork to flatten each cookie, pressing down in a criss-cross pattern. This not only looks pretty but also helps the cookies bake evenly.
- Bake. Bake for 8-10 minutes, or until the edges are golden brown and the centers are set. Keep a close eye on them, as they can burn easily.
- Cool. Let the cookies cool on the baking sheet for a few minutes before transferring them to a wire rack to cool completely. This prevents them from breaking. Enjoy!